Wednesday, 6 October 2010

Studio and Darkroom Rules.

Darkroom Rules
1.     No eating or drinking
2.    No running or fooling around
3.    No coats or bags on the floor
4.    Dry hands before handing any electrical equipment
5.    Use tongs to handle photographic paper
6.    Do not mix the wet and dry side of the darkroom.
Studio Rules
1.     No eating or dinking
2.    No running or fooling around
3.    No coats or bags on the floor
4.    Beware of cables on the floor
5.    The flash heads can get hot therefore handle with care.
6.    Do not look directly into flash heads as they will damage eyes.
7.    Be careful when using the paper backing system.
8.    Handle all equipment with care.

Notes on cameras

The process in which a picture is taken through a camera lens is a complex process. Light patterns reflect from objects, these light patterns activate a sensitive chemical or an electronic sensor during a timed exposure. This is carried out through the photographic lens. This is how a picture is taken, the photograph (picture) is then stored inside the camera.
A camera is a device that stores images. The camera obscurer was the first camera creation, it is also known as ‘dark chamber’. The earliest mechanism of projecting images, an entire room functioned as a real time camera using natural light exposure to capture. Light always travels in a straight line, therefore when entering the lens the picture is upside down.
The shutters main function is to allow light to pass for a determined period of time , for the purpose of exposing photographic film or a light. It uses a sensitive electronic sensor of light to capture a permanent image of a scene.
The aperture is the hole with the lens. The light that travels in is measured in f-stops. The aperture ring opens to let light through.
The lens captures the light to send a focus on the film or detector.
The size of the aperture and the brightness of light entering the lens controls the amount of light that enters. This is the exposure control. The shutter controls the amount of time that light hits the recording surface for. Larger aperture and faster shutter speed does this, and a smaller aperture and a slower shutter speed will do the opposite.
The depth of field is the foreground and background, and which is in focus. The depth of field can be flipped, changing which ground is in focus.  
There are many different genre’s of photography. A genre is like a category, type, or in the case could be described as a ‘theme’.
·         Arial photography is a type of photography that is taken from high up, from a birds eye view.
·         Black and white photography speaks for itself, it is a type of photography that is taken with no colour, in grayscale or ‘black and white’.
·         Commercial photography is advertisement, a photograph that is selling something.
·         Documentary photography is a photograph that is documenting something, could be the life of something or someone.
·         Fashion photography is photography showing fashion clothing.
·         Fine art photography is photographs taken of some form of fine art, this could be natural wild life, portraits.
·         Forensic photography is photography used for evidence, mainly used by police.
·         Glamour photography is photography taken of women being portrayed in a sexual way.
·         High speed photography, this is when photographs are taken of something moving at a very fast speed. But focused on the image so that the blur is the background not the focused image.
·         Illustration photography is photography of something illustrating a story.
·         Landscape photography is photography of a horizon line.
·         Nature photography is photography of wildlife, or anything natural.
·         Paparazzi photography is photography taken by paparazzi, usually of celebrities ‘surprised images’
·         Photo journalism is photography that presents news material for broadcast using photography.
·         Portrait photography is photographed persons/objects in a positioned or posed manor.
·         Still life photography is photographed images of random objects  positioned for photograph.
·         Underwater photography, is photographs taken underwater.
·         Wedding photography is posed and positioned photography specifically for weddings/proms.

Monday, 27 September 2010

Pinhole Camera Evaluation

Evaluation
For my assignment I was to build a pinhole camera,  not knowing what it was made it very interesting.
A pinhole camera has two other well know names, ‘camera obscurer’ and dark chamber. It is a box (of any sort, has to have a lid) that had a small hole in the front that works as the lens. By having a lid, it makes it simple to load and unload the camera with the photo paper. The pin hole camera is sat down facing the required scenery wanted in the photograph, kept very still and the shutter is removed for the designated time for exposure, and closed as soon as the time is up. It works because of the light exposure. The light travels in a straight line through the hole and hits the photographic paper on the back and prints the image. No light apart from the light through the pin hole should enter the camera.
After finding out what it was, it was time to build my pinhole camera.


How I build my pinhole camera

I used a small cardboard jewellery box to build my pinhole camera. My first step was to cut a square at the front of the box the size of a postage stamp, to do this I drew an outline in pencil, to  make sure I was happy with the size, this will be where my lens goes, I cut this hole using a knife.
My next step was to ensure my box was lightproof inside. My box was shiny on the outside and white on the inside with a shiny boarder at the top, due to this I had to paint it black to cover up the white and shiny colours that light bounces off of. Black absorbs light instead of reflecting it, that’s why we use black as our lightproof colour. Once the box was painted and had dried it was time to create our pinhole lens.
To create the lens I used tin foil and cut out a square of the foil,  making sure the foil was 1cm bigger on all four edges, than the postage stamp size cut out. To stick the foil to the lens I used duct tape (making sure the shiny side was facing outwards), I taped all four sides of the foil making sure the tape didn’t cover the lens whole that was cut out previously (postage stamp size). Once this was complete I used a pin and poked it through the middle of the foil creating the ‘pinhole’ lens.
Now that the pin hole camera was made I was ready to load it with the photographic paper.
This process has to be completed inside the dark room. This is so that no light enters the camera, as the photographic paper will be ruined and no pictures will then be printed. To capture I held my camera in a position for 30 seconds after taking off the lens. The pinhole camera is then taken back into the darkroom for printing, where it is put into three different chemicals.
The developer for 30 seconds, the stop for 10 seconds and the fix for 5 minutes. After each photo I looked at it in detail to see whether or not to change the exposure time.
I had 4 photo’s with my jewellery box, two of these photographs came out nicely, and two weren’t left out for the correct exposure time. I then used a different pinhole camera to capture my last two photographs, one of these was very good, and the other was also left out for the wrong exposure time.
I found it very difficult to predict the correct exposure time, as the sun light was very unpredictable that day. Therefore many of my pictures came out darker than I would have hoped.
If I had the chance to make my pinhole camera again I would choose I larger box as my photographs were extremely small, with very little detail, I enjoyed using the larger pinhole camera much more.

Overall I was happy with my resulting photographs, and I enjoyed making, capturing and developing my photographs, it was very interesting to learn about and to be able to actually carry out the task.

History of the pinhole camera

The first pinhole ‘camera’ dates back to 1544. The first camera was actually a room, a dark, dark room used by Gemma Frisius, to view the solar eclipse. This was the first use of any form of pinhole camera.
Alhazen lived in the Middle Ages; he invented the first pinhole camera, and discovered why the camera projects photographs upside down. The pinhole camera is also knows as ‘camera obscurer’.
Although Alhazen invented the first pinhole camera it was Joseph Nicephore Niepce who took the first photographic image on the pinhole camera. Before Niepce, the camera obscurer was only used for drawing and viewing purposes.
Louis Daquerre also experimented with trying to reduce exposure time and the wonders of photography. He was the inventor of the first practical process of photography. In 1829 Joseph Niepce and Louis Daquerre formed a partnership to improve the process of photography that Niepce had already started to develop.
As I said before the pin hole camera dates back to the Middle Ages, with cameras of all shapes and sizes slowly developing more and more into the modern cameras we see today. Although cameras are developing more and more, each one is still based around the production and research gone into inventions of the pinhole camera.


My analysis of my photographs from my Pinhole Camera

My analysis of photographs

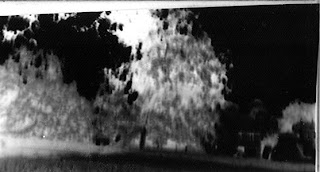
Photograph One: My first photograph came out well and I was pleased with the outcome. I left it for 30 seconds in the sun exposure to capture. I took a picture of some trees and the grass, the final outcome was very detailed and pleasing.

                                             
Photograph two: My second photograph was left for 30 seconds again, but came out completely black apart from one corner; this was because when I loaded the camera, I accidently stuck the photographic paper on the wrong side of the camera. Therefore I got no picture from it.


Photograph three: My third picture was again left for 30 seconds; however the light exposure had gradually changed outside since the first picture, and the picture came out black.


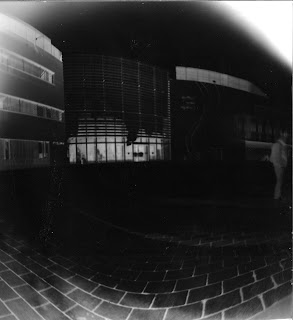
Photograph 4: My fourth photograph I wanted to try one inside instead of out, I placed the camera on a table in the front of the class room, I didn’t leave the photograph long enough so there was little detail, but I liked the effect that it came out with. So kept it.


Photograph 5: My fifth photograph was left outside for 20 seconds, this came out completely black apart from one corner. Negative:


Photograph 6: My final photograph was left to capture for 8 seconds. This was my favourite photograph and came out better than expected.  

Thursday, 23 September 2010

The process of my pinhole camera.


How I made my pinhole camera
To build my pinhole camera I brought in a small cardboard jewellery box. On the side of my box I drew an outline of a small square (the size of a postage stamp). To cut this square out I used a knife I did this in order to create a hole for my lens.
After cutting this hole I painted the inside of my box, and the lid of my box black to ensure no light is inside the box. If light has entered the box whilst taking a picture apart from through the lens the light bounces off of the light colours and will ruin the picture, as it will not develop.
I stuck foil over the postage stamp size hole using duct tape and made a small hole in it using a pin. This created the lens.
After doing this I created my shutter by folding a piece of card over my lens and duct taping it down on one side, and the other side having some tape in order to open and close the shutter.
Following on from this I measured my focal length and divided by the size on the pin whole to figure out my aperture, my aperture is f93.
 I needed to find out my aperture length to know how long to take the picture for. Mine showed that approximately; outside I should leave mine for 30 seconds, and inside 4 minutes.

Loading my camera
Once finding out all of this information it was time to load my camera, I cut a piece of paper to the size of one side of my box, and stuck it to the edge of my box that is facing the pinhole. I did this in the dark room to make sure no light was on the photo paper.

How to capture and develop
Once loaded I took my camera outside to one of my chosen destinations.
I wanted to take a picture of 3 trees and the view in the background. I placed the camera on the grass to take the picture, I made sure it was still and the shutter was open for 30 seconds, once the 30 seconds were up I closed the shutter and took my pinhole camera strait to the dark room for developing. Once in the dark room I unloaded the camera by removing the photographic paper from inside, I then placed the photographic paper face down under the first tray of chemical solution the (developer) for 30-60 seconds. Once the time was up I removed the paper from the developer and put it into the stop solution
 For 10 seconds, then into the last tray (fixer) for just 30 seconds before going outside the dark room with the picture to check whether it had taken properly, if it was a good picture then it was then put back into the fix solution for a further 5 minutes. Once finished in the fixer for at least 5 minutes the paper then needs to be cleaned in water to ensure no chemicals are left on the paper.  My next few images I left for 30 seconds came out dark and black, this was due to the excessive sunlight, and the changing sun exposure. I then experimented with timing and changed my pinhole camera, because mine was far too small to get a decent picture. I was given another pinhole camera to use, and changed the exposure time to just 8 seconds after experimenting. My final photograph came out as a success and I was very happy with it. After every photo was finished I took the camera back to the darkroom to unload and repeated the developing process for every picture.

Scanning my photos
In order to scan my photograph I had to use my student card to log into the photocopier and ensure that the scanner automatically sends my photos to my e-mail. I placed the photos in the top left hand side of the scanner, and pressed the ‘send to myself’ button on the scanner, and made sure they were all JPG images by selecting JPG image on the format settings, and pressed go. I repeated this for all 6 of my photos.